What are the tips for installing Roots blower impellers

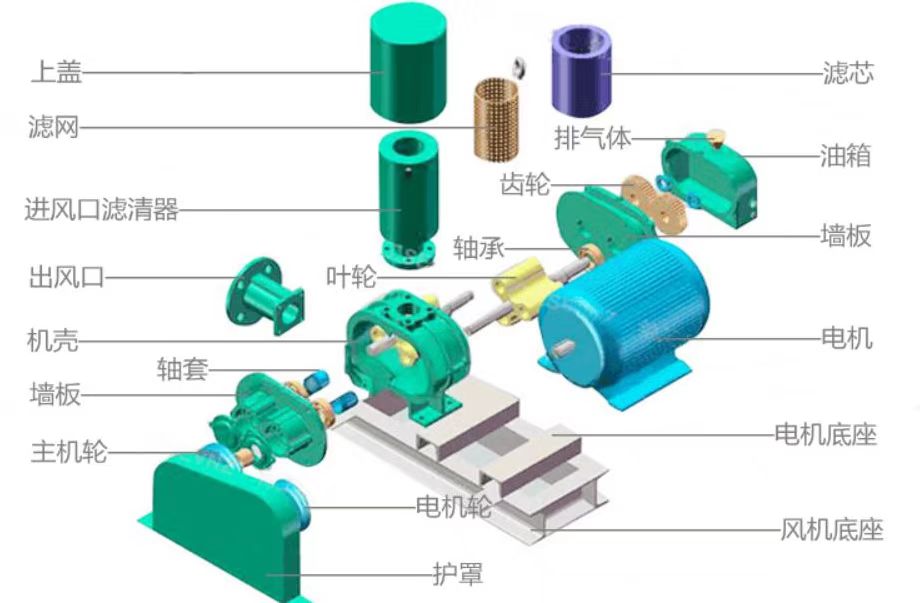
The installation of Roots blower impeller is a critical step, and its installation quality directly affects the operating efficiency and stability of the fan. Here are some tips for installing Roots blower impellers:
1、 Preparation work before installation
1. Tool preparation: Ensure that all necessary tools are complete, such as wrenches, jacks, calipers, feeler gauges, magnetic liquid seals, specialized alignment tools, etc.
2. Parts inspection: Carefully check whether the impeller and related parts (such as bearings, shafts, end caps, etc.) are intact and clean.
3. Measures: Wear appropriate protective equipment, such as hats, gloves, etc., to ensure safety during installation.
2、 Installation steps
1. Installing bearings:
Clean the bearing seat to ensure there are no impurities.
Use professional bearing installation tools to press the bearing into the bearing seat to avoid damaging the bearing.
2. Positioning:
Use professional alignment tools to ensure that the impeller is aligned with the bearing seat.
Position the impeller inside the fan casing to avoid damaging the blades.
3. Apply lubricating oil:
Apply a small amount of lubricating oil at the joint between the shaft and the impeller to facilitate the smooth insertion and rotation of the impeller.
Be careful to avoid lubricating oil entering the air chamber of the fan, so as not to affect the performance and service life of the fan.
4. Install impeller:
Use a jack or specialized tool to assist in installation and smoothly slide the impeller onto the shaft.
Ensure that there is no gap or deviation between the impeller and the shaft, and tighten them appropriately.
5. Adjust gap:
Measure the total clearance between the impeller and the two end faces using a feeler gauge, ensuring it is between 0.2 and 0.4 millimeters.
By adding or removing gaskets, the total gap between the impeller and the end cover is evenly divided on both sides, with a gap of 0.1 millimeters on each side.
6. Install other components:
Install the shaft sleeve, bearing seat, oil seal and other components in sequence.
Install the bearing pressing plate, anti backlash gasket, and lock the shaft.
7. Dynamic balance check:
After installation, perform a dynamic balance check to ensure the stable operation of the Roots blower.
If an imbalance is found, corresponding adjustments need to be made.
3、 Installation precautions
1. Alignment: The alignment error between the impeller and the shaft should not exceed 0.02 millimeters to ensure the stability and efficiency of the fan operation.
2. Temperature control: During installation, pay attention to controlling the ambient temperature to avoid thermal expansion and contraction affecting installation accuracy.
3. Cleaning requirements: During the installation process, it is necessary to maintain cleanliness to prevent impurities from entering the interior of the fan, which may affect the performance and lifespan of the fan.
4. Force control: During installation, the force should be moderate to avoid damaging parts with excessive force.
5. Gap inspection: Carefully check the gap between the impeller and the casing to ensure compliance with design requirements.
4、 Maintenance and upkeep after installation
1. Regular inspection: Check the operation of the impeller every month, paying attention to any abnormal sounds or vibrations.
2. Cleaning and maintenance: Clean the impeller quarterly to remove any accumulated impurities.
3. Lubrication maintenance: Regularly replace the bearing lubricating oil according to the manufacturer's recommendations.
4. Gap review: Check the gap between the impeller and the casing every six months to ensure no changes have occurred.
In summary, correctly installing the impeller of a Roots blower is a key step in ensuring the operation of the blower. During the installation process, it is necessary to strictly follow the installation steps and precautions to ensure the installation quality and the stability of the fan operation.


